Wednesday 31 March 2010

Making Massage Bars - in a New Mould Design !


Here we go - a sneak preview at one of the new moulds we'll be launching in a couple of months time.


We've got a vast range of new styles and colours of flexible silicone moulds coming. I think there are over 30 different styles aimed just at soap making alone - though you could also use these for cakes / jellies etc if you wished.

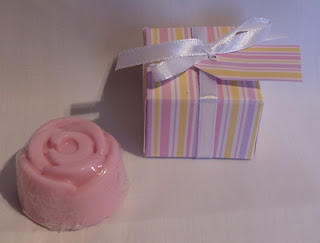
I had a good play with this one yesterday and made some massage bars. These are really nice and smell gorgeous. Perhaps melt a little too fast though. I'll add a small amount beeswax next time to make them harder. The butters and oil literally melt in your hands or on skin contact.


I'm a huge fan of Lush massage bars - especially Sore Labours. They used to make a mint one with dark and white chocolate called After 8.30. It smelt lovely - but good grief - I was brown from top to tow afterwards !!!! I'll stick with plain ones now - the chocolate made a real mess of the sheets and the bath water afterwards looked like mud !

Anyway - basically, I melted an equal quantity of cocoa butter, shea butter and coconut oils on a low heat in a saucepan and then added some honeysuckle and vanilla fragrance oils.


After pouring and allowing them to come to room temperature, I popped them in the fridge overnight to set.


After that, they were put into little cellophane bags and I made boxes to suit. See the previous post to this one about wedding favours if you want to know more about the boxes.


This mould in particular is so very pretty. There are 4 cells in the mould - two cells of each design. This mould will be called Soap / Cake Set no.7 when available and should be on our shelves by July.


Sarah-Jane Nash - http://www.siliconemoulds.com/ - April 2010

Wedding Favours - A Blog Entry for James


This post is for James.

James has been asking about the size of box (or purchasing suitable boxes) to house rose shaped chocolates to give as wedding favours.

I actually made the box pictured above. This box is 45mm square and 30mm high. It is not a chocolate pictured above, but a little soap - left over from making the soap bouquet earlier this month.


Making little soaps, candles or even chocolates and boxing them are easy to do and ideal for wedding favours. Of course, you can always opt to buy ready made favours boxes - but it's SO easy to custom make your own. I tend to melt the soap in the microwave - but I melt chocolate and wax in a double boiler. (bowl over simmering pot of water)


I bought a Crafters Companion Top Score Board from Ebay for about £10 including delivery. The top score board is for making cards and also for making cardboard boxes any shape and size you like. It may just be a piece of plastic - but it's a very very clever one at that. I've got no interest in making cards - but it's paid itself off long ago as far as boxes are concerned....


There are two sides to the board. One side is for scoring cards (mainly) and making scalloped edges. The other side if for making boxes.

Use it one way up for making the lids. Turn it round and score the card using the other lines to make a matching base. That way, you end up with a bottom and a top to your box that fit perfectly together.

It does come with instructions and is very easy to use....

Once your card is scored, all you need to do is flod it and snip out little sections so you have flaps. The flaps and sides can be glued - but I prefer to use double sided sticky tape.


After that - it's just a case of filling and dressing your boxes. :-)

I like to use Kanban card for the tops which comes in a huge selection of colours and patterns, which again I buy from Ebay.. I've got a massive box of the stuff stashed under the bed. It's always great fun picking card out for a project. I think I enjoy picking the card out more than anything else !

For the bases, I just use a cream or white card. I tend to buy hammer finish card for this as I can then choose to use the plain side or the textured side. This generally isn't seen anyway - so no point in wastin the more expensive fancy stuff.

For our 15 cell moulds - which are all suitable for soap, wax and chocolates ( rose, chrysanthemum, sunflower, flower, bonbon and crystal) cut your card into 105mm squares before scoring and folding. You will get 4 pieces from a piece of A4 cardstock with plenty left over to make little gift tags too.


I'm just about to buy some of this cardstock - link to Ebay seller. Isn't it GORGEOUS ?
(I've pinched the sellers picture - but given I'm plugging them, I don't tihnk they'll mind ...)

Tuesday 30 March 2010

Burgled !


Oh yeah - how could I forget... I got burgled on Saturday night / Sunday morning......

I may now be living in Norfolk, but I have a several acres of land back "home" in Scotland with a lovely wooden building on it. The building was constructed for stables for my ponies - and they were specially made to order and have never been used,

They were exactly the same as the ones pictured and made for me by Monarch Equestrian . They took so long to commission, that by the time they arrived, I'd met my now husband and got engaged ! My poor ponies have never got to go in those stables as I ended up moving them and me down here.

I've been in Norfolk 8 years come next month. I've since built a barn down here (specially to size)  to put THOSE stolen stables in and was just about ready to trasnport them down from Scotland. Now, some bunch of thieving scumbags have broken in (cut right through the middle of the locked roller shutter doors to the building) and have stolen my stables !!!!!!! I'm heart-broken.

I'm still waiting to hear if the insurance is going to cover it. I'm insured for building and stables only - including theft with no contents ( there aren't any !) It's dubious at the moment though they THINK my stables are covered. They've never had stables stolen before...

Cakelets and Mini Cakelets


I made these at the beginning of the month for Oliver's Tiny Talk class one Friday. I meant to blog it at the time but somehow never got round to it - so I'm having a bit of a catch up and clear down of photos

Tiny Talk is a franchise run baby classes throughout the UK and Australia. It's for teaching babies and toddlers how to better communicate with their parents and carers through signing and play. I take Oliver to Maria's local group most Friday's in Attleborough / Norfolk. He absolutely LOVES it and Maria is a very enthusiastic teacher.

Oliver can sign a few things already and as he learns new words uses the signs alongside. He's learnt to say "Yes Please" and No Thank You" already this week and is also backing them up with signing.

These certainley didn't hang about - mummies and babies made sure of that :-)

The mini cakelets above are just a standard victoria sponge mix filled with fresh cream and jam. For the chocolatey ones - the recipe is HERE 


What is a Cakelet ? It's a tiny little layer cake. A dainty and delicate little morsel - gone in a few little bites. Light enough and small enough that it can sit beside a cup of tea - balancing on the edge of a saucer and not ruin one's appetite.....

A mini cakelet is just a smaller version of the same - gone in just a couple of mouthfuls. It's similar in volume to a mini muffin / mini cupcake - but more ladylike or dressy for a summer garden party or to serve with afternoon tea and nibbles.


Make it simple - like miniature victoria sponges with just a teaspoon of cream and tiny bit of jam... dressing the top with a delicate covering of icing sugar. Or jazz it up with pretty crystalised flowers or intricate icing. As the baker, the choice is yours :-)
Like all our flexible silcone moulds, this mould can be used for chocolate, soap, cakes, orgonite, hard candy and many other uses. Our range of molds are all food safe and FDA approved.

Safe temperatures are from -40deg C to +230deg C - which is higher than most normal ovens go and way too hot for cakes !
Two of these moulds will fit on a standard baking sheet

Monday 29 March 2010

Chocolate & Ginger Frosted Brownies


I'm a bit late with this one - it was last Saturday's bake-up for taking to work. However, just as I'd finished frosting it, Oliver gave me a real scare and it resulted in a hospital trip to A&E. The brownies therefore never made for a tea-time treat for customers .... I did however give some to our next door neighbours.

Oliver had about 1/4 of one after his tea and polished the whole lot off !

The "lads" - (or should I say lad and old man :-P) at work helped polish the rest off today. Given the fact that one wasn't enough, I think these turned out a good success.

The recipe for the brownie bit is adapted from a Martha Stewart recipe. The frosting is something I've been tweaking for a while. I'll warn you now - the combination is subtle but rich.

INGREDIENTS

120 grams SALTED butter
100 grams chopped plain / bitter chocolate
1 cup sugar
2/3 cup plain flour
1/4 cup cocoa powder
2 large eggs
2 tsp ground ginger
1 tsp vanilla extract
pinch ground cloves
1/4 teaspoon coarse salt (Maldon)

Preheat fan oven to 170deg C. Cook for 25mins approx

Line an 8 x 8 tin with buttered parchment - or use an 8 x 8 silicone tray mould. We're due 8 x 8 tray moulds to arrive end of April - early May - so I use a silicone liner (cut to size) inside my  8 x 8 standard tins at the moment. 

Melt butter and chocolate together at a low heat and stir until smooth. Remove from heat and stir in other ingredients.


Pour batter into prepared tray.


Bake until skewer comes out with moist crumbs.


Leave to cool for about 10 mins in the tin - then turn out on to a wire rack to cool fully before frosting.

FROSTING

100g cream cheese
70g of salted butter
50g of cocoa powder
75g melted bitter chocolate
220g icing sugar
1 x finely grated ball of stem ginger in syrup

beat cream cheese, butter and icing sugar and cocoa until smooth. Beat in melted chocolate and ginger
1/2 finely grated ball of stem ginger in syrup (to decorate). Refrigerate for 15 mins and beat again before spreading.

The frosting amount here is exactly what I put on top of the brownie pictured and was pretty thick ! Saying that - it's light and fluffy, and not overly sweet.

Sarah-Jane Nash - http://www.siliconemoulds.com/ - March 2010

The Little Cake Tester - especially for Eve


This is my little cake tester - Oliver - 17 months. He does like cake.... :-)


Photos taken at a visit to Banham Zoo earlier this month. I'm a season ticket holder - so we go rather frequently


We have some cake testers in the way of work colleagues to - but I'd scare you too much if I introduce you to them right now. When they've finished wiping cake off, and I find a shatter resistant lens - you might be unlucky ! Hahaha - we'll see.....

Sarah-Jane - http://www.siliconemoulds.com/ - March 2010

Thursday 25 March 2010

Double Raspberry Cheesecake Cupcakes


If you like cupcakes, raspberry and cream cheese frosting - these are killer cupcakes. Possibly give you a heart attack with so many calories - and certainley add a few inches to the waistline.

These were a bit of an invention at the weekend - and it worked really well.. but fairly serious in the calorie stakes !

I'm really not sure I should post the cake mix part of the recipe, as it came from Primrose Bakery Cupcakes book. See the recipe for Raspberry cupcakes. Basically, it's a vanilla cupcake mix with three tablespoons of raspberry jam swirled through before being put into the paper cases. After baking (once cool) you are supposed to make a little hollow and put in a teaspoon more of jam before icing with a white chocolate buttercream. It IS however better than their standard vanilla recipe - though that's not too bad.


I deviated from the recipe somewhat. I used the recipe for the sponge part - but divided it between 15 cases instead of the recommended 12 in a cupcake mould. Before cooking, I put a spoonful of white chocolate cheesecake mixure on top of that. The result of which was a moist, sweet (but not overly so) cupcake with a real rich cheesecake type tang.

I think I went a bit overkill - as on top of that, I slathered a raspberry cream cheese frosting. the frosting was really just a basic cream cheese frosting with plenty added raspberry jam and icing sugar until the consistency came together. It set well - with a soft shiny sheen. There is no food colouring in the icing - it's only the raspberry jam that has given it the colour. Stupidly, I've managed to delete my image of the frosted cupcake - so you'll need to make do with one on the cooling rack pre-frosting !


140g cream cheese
60g caster sugar
1 large egg
1 tsp vanilla extract
pinch salt
100g chopped white chocolate

beat above ingredients slowly together until well combined. Stir in chocolate chips / chunks.


I'd recommend trying the cheesecake part on top of your favourite cupcake mix :-) Take care to cook until only just set or it's ruined..


Enough to top 12 cupcakes - bake cupcakes at 160  >170deg C

A little sickly perhaps - unless you are a lover of cream cheese icing !

Sarah-Jane Nash - SiliconeMoulds.com - March 2010

Monday 22 March 2010

Soap Bouquets ...


Since I had a go at the cupcake bouquet, I just HAD to have a go at making a soap bouquet using this pretty little silicone mould for making little rose heads. We have a good selection of different flower types including chrysanthemum, flower, sunflower, and rose in this small size. A bouquet of soaps would look stunning made with any of these - or even a mixture of these. Likewise, the same result could be made with chocolate roses or flowers !


I've used the exact same principles as before - only this time the ball I used was 4" and polystyrene from a craft shop. I cut a little off with a serated bread knife to give a flat base and stuck it on top of a little tinplate watering can with some double sided sticky tape. The soap base was opaque melt and pour SLS free


The watering cans ARE usable and came from Asda. They have them in pink and green at a bargain price of 2 for £5.00

Each soap is held in by one toothpick. At this point, I hadn't wrapped them - but after photographing I removed each one, wrapped in cling film (saran wrap) and them put back in place.

20 little soaps were required to cover the ball. In between are some fake rose buds and gypsophila snipped from a fake flower posy.


For all florists supplies, there is a great flower supplies wholesaler in Banham, Norfolk with loads and loads of stuff - from wrap to ribbon, fake flowers, baskets by the billion all sorts of vases, stones and anything else associated with that sort of trade. They are not on line unfortunately. For anyone wanting ot visit, they're open 7 days and right next to the entrance of Banham Zoo.....


Friday 19 March 2010

Little Duck Cupcakes (and Bunny Ears)


I made some vanilla cupcakes today from the Hummingbird Bakery Cookbook for the charity day at Oliver's Tiny Talk toddler's class. I frosted them with a lemon flavoured buttercream.

Given it was for toddlers, I went a bit mad and made little ducks and bunny ears too to dress them up a bit.


I got exactly 12 cupcakes out of the mix, exactly as specified in the book. I used muffin liners in my silicone muffin tray because I planned to ice the cakes. I think I would have been seriously short and probably needed twice as much frosting had I not used sugarpaste to make ponds for the ducks. There certainley was nothing like enough frosting to pile it up like the photos in the book.


I only got a tiny bit of Oliver's cake - but the sponge seemed nice. I'll need to make more another day and actually eat one to report on that !


A British Classic - Toad-In-The-Hole


Such a basic basic meal - but such an overlooked British Classic. It's YEARS since I last made this and I'm now wondering why I've left it so long ! It's basically a yorkshire pudding batter with sausages baked in.

Simple ingredients, simple to prepare and quick to cook... I made mine in a silicone roasting tray which makes washing up afterwards a complete breeze. These do need supported on a metal baking tray.

3 x fresh medium / large sized eggs
3oz plain flour
225ml milk
3 tablespoons sunflower or vegetable oil
salt and pepper
favourite herbs
8 > 12 butchers sausages

preheat fan oven to 200deg C

put raw sausages in a roasting tray in the oven with the oil to brown for aobut 10 > 15 mins

Meanwhile, make the batter.

Whisk together milk, eggs, flour, salt, pepper and herbs (if using).


It's a glorious yellowy colour with the bright yolks from our own free ranging hens

When the sausages have started to get a bit of colour

Whisk eggs, milk, plain flour, salt, pepper and herbs together to combine

Pour the batter into the tray with sausages.


Bake in oven for about 15 mins until puffy and golden brown edges.


Serve with some homemade gravy, potatoes and veg of your choice.


Sarah-Jane - http://www.siliconemoulds.com/ - March 2010

Saturday 13 March 2010

Red Velvet Cupcakes


I've been meaning to have a go at Red Velvet Cupcakes for some time.... and an ongoing thread on the Omlet Forum spurred me on for this weeks bake.

I used the recipe from Martha Stewarts Cupcakes book - with a yeild of 24 standard sized muffins (2 silicone tray loads).

The photos do no justice. The mix was a vampire blood red - far far FAR brighter  and truly shocking to say the least. It certainely put a smile on my face and I couldn't stop laughing as I made them.


Unlike my attempt with macarons, the red velvet cupcakes did keep the colour and all rose well in the oven. I also managed to get exactly 24 cupcakes out of the mixture.


Iced them with a basic cream cheese icing. The white made the red really stand out - but unfortuantely, again - the photos don't do the colour any justice.


Would I make them again ? Most certainley.... but I'd likely go with a different recipe as I wasn't bowled over with this one. It was ok - but nothing special....