Tuesday 28 September 2010

Belgian Chocolate Bunny Rabbits !


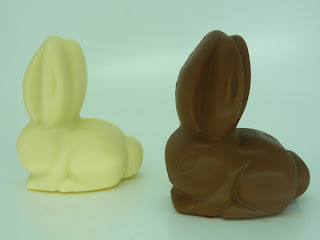
Aren't these cute ? I made a pile of Belgian Chocolate white and milk bunny rabbits last night using one of our newest chocolate moulds. Here it is - 16 cell chocolate bunny rabbit silicone mould.

Try, try and try again... I've wasted a fortune on trying to mould chocolates. For some reason I've always had horrible results in the past. My chocolate has come out with those white mouldy looking marks. I've heated in a special chocolate melter, I've tried the microwave and a double boiler..... all with horrendously bad results !

However, now I think I've discovered the secret and got perfect results with all 14 chocolate bunnies that I made (I didn't fill the whole mould). Each chocolate bunny is approx 50 x 60 x 20mm and solid chocolate weight is 33grams each.

Lindt eat your heart out ! These will make gorgeous little chocolates for any age group - especially children. You should have heard Oliver squeal when he got one of these this morning !


I've always used normal "eating" chocolate in the past from the supermarket. I've tried the belgian chocolate from the baking isles and various brands from the isle with sweets. All my efforts were in vain and my resulting chocolates looked rubbish and many tasted just as bad.

The secret is in the chocolate itself. Buy COURVETURE chocolate which is specifically meant for tempering. It can also be used thinned down in chocolate fountains.


The brand I bought is called Callebaut. It comes in milk, plain and white and is Belgian chocolate. Tastes simply yummy ! Various sizes of bags are available. I bought 2.5kg bags from a local cake craft shop at approx £15 each. I think smaller 800g ones are also available.

I simply slowly melted it in a melting pot. When it was nearly all melted, I took it off the heat and kept stirring until the rest melted in. Then, poured into the cells of the mould. Once almost full, a rap on the kitchen side to dispell air bubbles and a light shake side to side evens the chocolate. It was basically self levelling and I did not even have to screed it off with a pallet knife.

Now I've got the hang of it with perfect results, I'm looking forward to making more using different moulds and putting soft centres in the middles.

We've got a collection of various new chocolate moulds arriving in November. I've got one of each to play with and photograph now - so you might be lucky enough to see some photos soon !

Sarah-Jane Nash - http://www.siliconemoulds.com/ - silicone bakeware mold specialist. September 2010

Monday 27 September 2010

Lavender and Blossom Honey Cupcakes (mini size)


These are different. Really very different.

I had been combing the net, looking for a "different" cupcake or muffin recipe last week to make cakes for taking into work on the Saturday.

Our wood burning stove Shop gets really busy on a Saturday at this time of year, and I like to be able to offer customers a homemade cake and coffee whilst they wait or have a browse...

I found a recipe HERE for Lily Vanilli's Lavender and Honey Cupcakes.

All I can say is WOW. You might remember the taste from when you were a child of Parma Violets. Well - it's a floral kind of taste like that and almost astringent too.


Instead of normal cupcakes, I made mini ones using an extra deep silicone mini muffin mould. This mould is generally for commercial and semi commercial bakeries - but works amazingly well cut into 2 trays of twenty cells each in a conventional oven. Unlike normal mini muffin tins, this is a little deeper and has straighter sides. When making muffins, you fill the mix to the top of the paper cake case. The muffins rise with a lovely domed top. Mini cupcakes worked in a similar way - only the batter acted differently, so I got a sort of spread crown at the top.


You really do know that the lavender is there. You infuse milk with the lavender and this is then added to the batter and to the frosting. The batter made 40 mini cupcakes. You needed to eat one and then have a second to really decide if you liked it or not ! It was most unusual, but really fragrant, flowery and girly. These had frosting overload - but the frosting was glorious. I must admit, I made the frosting up as I went along and didn't actually use the recipe for that at all. However, I think it would have been very similar.

We've got some really cute mini muffin paper cases in stock now and loads of standard 50mm base size muffin paper cake liners coming in too very soon. The ones photographed are actually specifically for the 40 cell extra deep mini muffin mould as they have a slightly oversize base diameter to suit that mould. We've got those in several patterns although they are not yet online in our website shop.


Sarah-Jane Nash, http://www.siliconemoulds.com/ - the biggest online silicone bakeware cook shop. Shipping worldwide.

Winter is Coming - Don't Forget the Birds !


It's Autumn now and there is a glut of blackberries, rowan, hawthorn and all sorts of other berries for the birds to gorge on. However, it won't be long before these disappear.

If you like feeding and watching the birds in your garden, homemade fat balls for the birds are easy and cheap to make. They require little effort and are an ideal project for young children (under supervision of course !) You can even select specific seed and fruit combinations to suit certain species if required.

They'd be lovely packaged up as a gift with a hanger for a garden or outdoors tpye person as a Christmas gift. Alternatively, recycle and tie them in old nets that used to contain oranges or brussel sprouts !

To make these, I used the baby bundt silicone baking mould


Use approx 1/3 solid fat (such as lard or suet) to 2/3 bird seed / crumbs. Melt the fat and mix into the dry ingredients. The fat does not need to be hot. It will melt in the microwave at a pretty low temperature - much like butter.

Spoon into your mould and leave to set. Refrigerate if you have space to get them nice and hard before turning out. They'll pop out with just a light pressure. This would work really well with loads of other moulds too - such as the 6 semi sphere - but I specifically wanted a hole through mine to put on to a home made hanger with a net over the whole lot.

In the photos, I used a huskless wild bird seed blend with dried fruit through it.


Sarah-Jane Nash, http://www.siliconemoulds.com/ - flexible silicone bakeware cook shop. September 2010

Tuesday 21 September 2010

Pecan Revamped Empire Biscuits !


Empire biscuits are a traditional Scottish bakery item. They consist of two shortbread biscuits, generally sandwiched together with rasperry jam. These are them topped with a water icing and glace cherry.

The shortbread should literally melt in the mouth. My secret is cornflour - never make shortbread without cornflour....

I decided to vamp them up a bit to put a new twist on an old recipe. What I didn't expect is that they would turn out so good ! These are VERY sweet but truly awesome. I'm sure you could also play with the flavours and come up with some other super alternatives.

For the filling, I used some fig and orange blossom preserve. Approx 1 teaspoon per biscuit base, and then put another biscuit on top to double up. The preserve had big lumps of fig in it, so I gave it a whizz in my mini blender and then microwaved the smooth preserve for a minute or so to thicken it up.


For the icing, I used a few drops of Sainsbury's Taste The Difference Valencia Orange Extract in some icing sugar and mixed into a thick paste. Some of this was spread on to each top biscuit and then finished with a pecan half.

I only had 1/2 a biscuit out of the 24 that were made. The whole lot disappeared easily in under an hour at work !

For the dough :

225g salted butter (room temperature)
100g caster sugar
1 tsp vanilla extract
200g of plain flour
75g corn flour

Cream butter and sugar. Add all other ingredients and combine with an electric hand held whisk with beater attachment. As soon as starting to combine, use your hands - don't over work it.

Turn it out on to a well floured surface and cut into thin rounds (about 5mm thick). I got 26 pieces out of this batch. The dough will be VERY soft - so do be careful. Flour your hands and rollling pin quite well ! You could refrigerate before rolling, but I like to use this dough unrefrigerated as I want the biscuits to retain overall shape, but spread.

Place on to silicone baking tray liners on trays, or use baking parchment / greaseproof paper on trays.

Put in a preheated fan oven at approx 160deg C for 8 > 10 mins until edges are starting to take on just the slightest amount of colour. Allow to cool for a few minutes before transferring to a rack.


There is something really yummy looking about icing running off the tops of biscuits. I like them sort of messy looking.

Saying that, I really need to download the photos from my other camera of Oliver icing his and putting on dinosaur shaped sprinkles. Good grief - who needs hair gel when you can use icing ????

Sarah-Jane Nash, SiliconeMoulds.com - silicone bakeware specialist cook shop

Sunday 19 September 2010

Lighter Fruit Flapjacks


I love flapjack - but it's something I rarely eat and can only ever remember having made once in the past.

It's a mix of oats with copious amounts of sugar, syrup and butter packed solid with calories and often quite greasy.

Well - this recipe isn't like that. It's got a fraction of the amount of sugar and fat that is in a normal flapjack recipe that I found on Netmums website - posted by someone called Jackie and is VERY adaptable. This recipe gets most of it's sweetness from dried fruit and it makes an idea breakfast or energy bar. Flavour can be totally transformed by your selection of fruit / nuts / seeds. I've added a tablespoon more syrup to bind it a little more as our eggs are often on the small side.

Recipe

150g chopped dried fruit of your choice
(try 1/2 dried fruit, 1/2 chocolate chips - or 2/3 dried fruit, 1/3 seeds, etc)
175g porridge oats
50g butter
4 tablespoons syrup
1 beaten egg

Put all dry ingredients in a bowl. Melt butter and syrup together in the microwave and combine with dry ingredients. Add beaten egg and mix in well.

Turn into a greased tin and level the surface (I've been using my 8" square silicone fudge tray or large silicone heart shaped baking pan)


In the version pictured above, I've used a small handful of mixed chocolate chips (white, milk, plain) some chopped dates and chopped pecan nuts. Oliver helped mix the ingredients together. This is a really simple recipe to make with kids.

Pop into a fan oven at approx 170deg for 15 > 20 mins until top is starting to turn a very pale brown.

Whilst warm, use a BLUNT table knife to cut or mark into sections. Allow to cool thoroughly before serving. I served ours straight from the tray. Seemingly keeps for a week - if yours lasts that long....

Sarah-Jane Nash - Siliconemoulds.com - silicone bakeware cake moulds  - September 2010

Wednesday 15 September 2010

Coming Soon - New Style Silicone Spatulas


It's pretty busy here at the moment. More like chaotic actually and I'm working like a mad thing to make sure everything keeps running like a well oiled engine. There is little time for me to play, hence far fewer blog entries at the moment.

As summer drifts away, people are starting to think about lighting their wood burning stoves and switching on their heating. Autumn weather is bringing colder weather with it. Our seasonal food is changing from the vibrant summer mediteranean type vegetables and berry fruits, to starchier and more filling potatoes, onions and carrots. Out go the salads and on go our ovens to make hearty stews and comfort foods like puddings and cake.

It's quite nice isn't it ? Sad in one way - but it's so nice to have the oven on and the smell of a home made steak and ale pie in the oven or a nice loaf of fresh bread.

ANYWAY - I digress....

I thought you might like to see these two new styles of spatulas that we have now put into production. Both should be available from around end of November along with loads more stuff I've got underway.

The first picture is of a wedge head spatula. It's the sort of thing you look at and wonder what on earth it's for... Well - I'll tell you :-)

The spatula has a flat head. This makes it amazingly good for leveling cake batter and using to frost the top of flat cakes. As the head is triangular shape, the pointy edge can get right into the side walls of a round or square tin. I've been playing with it in my kitchen for a couple of weeks and it's proving a really good tool.

The picture doesn't give any indication of the size. The head is approx 90mm wide and 75mm long. The whole thing is 250mm long.


The second spatula is a really long slender one with a very flexible head. The head is 106mm long by just 25mm wide at the base and 20mm wide at the tip. Overall length is 280mm.

This one comes in handy practically every day for something. It's fab for icing with buttercream and gives you so much more precision. The flexibility of the head and the long slender shaft means it's so much easier and you don't end up with a knife which has buttercream half way up the handle ! It's great for tricky bits and doing the sides of cakes such as those made with our SAY IT WITH CAKE word moulds.

I also love it for getting the last of things out of bottles and jars that a normal table spoon won't fit in. Wait until you see how well it can get every last little bit of condensed milk out of a tin !

Ah - HANDS OFF ! These are MINE..... but it won't be long before you can buy them too. Keep an eye on http://www.siliconemoulds.com/ and our facebook page.

Thursday 9 September 2010

Tumeric and Tamarind Prawns


My photography always leaves a lot to be desired. I really need to get my SLR back out and also learn how to use it. Problem is, there is not enough light in our kitchen in the evenings and the photos are dire. As a result, I have only been using the SLR in daytime and my little instant digital at night.

This recipe for Tumeric and Tamarind Prawns is from the lovely and talented Zurin who has the Cherry On A Cake Blog . Zurin has just been given a slot in her national Malaysian newspaper for a new food bloggers column and created this recipe.

 What she may not know until she reads this (hiya Zurin !!!!) is that I've also used the photo of the CAKE cake she made on the front of our website this month. Isn't it GORGEOUS ?

Despite stuggling a little with ingredients in my local supermarket, I was determined I'd recreate it as accurately as I could.

Zurin's lovely recipe can be found HERE

Our little local supermarket didn't have shell on raw prawns - so I had to make do with raw king prawns. As I used 22 prawns (1 pack), I used 1.1/2 tsp of tumeric.

I couldn't get a block of tamarind - so used 2tsp of tamarind paste in 60ml of water.

I used two small onions - one normal and one red. The last of a rubbish onion crop from my veggie patch this year !

I used a whole great big red chilli which was fairly worrying as I know Malaysians like things HOT HOT HOT - but it really was fairly tame compared to my expectations.

I unfortunately had to miss out the corriander as my husband hates it. I think the corriander really would have been the cherry on the cake :-)

Very simple and tasty. Ready in under 15 mins including cooking the rice. If you like spicy food, try it - you won't be disappointed.

Thank you Zurin for your friendship, photos and sharing your recipes with us..

Lots of Love (and congratulations !)

Sarah-Jane

Ultimate Cherry and Ginger Fudge


I know - blog posts from me have been very thin on the ground this month. I've been working lots of hours and had very little time to play ! When I have been fiddling around in the kitchen, I've never got round to posting the recipes or photos.... so time for a quick catch up.

This recipe is for Ultimate Fudge from the Carnation / Nestle website - see here

It's a pretty easy recipe and makes a nice, tasty fudge (demolished by shop customers !) - but I can't say it's my favourite fudge recipe. It's buttery and crumbly. It tastes sort of like Scottish Tablet, but not quite as good as that. As far as fudge goes, I prefer it to have a little more bite.

Still - it's easy, and only a few ingredients are required. It's pretty yummy and boxes up nice as gifts. I don't think anyone I offered it to refused - and many had a second or third piece ! It didn't last too long....

397g can condensed milk
150ml milk
450g demerara sugar
115g butter

150g glace cherries, halved
55g stemed ginger in syrup (without the syrup) chopped

Grease and line an 8" square baking tin - or if using our 8" square silicone bakeware mould.... don't do anything to it at all !

Put all the first lot of ingredients in a heavy based pan. Stirring all the time, bring to the boil and boil for about 15 mins until soft ball point is reached

Remove from heat and beat until thick and grainy. Stir in cherries and ginger. Pour (scrape) into your tin or silicone bakeware mould and leave to set. It will be ready to turn out in approx 40mins - though I left mine overnight.


Here is the fudge turned out the mould


And just for the sake of it - I also poured some into one of the silicone soap moulds !


As you can see, again it came out beautifully !

Sarah-Jane Nash, http://www.siliconemoulds.com/ - silicone bakeware cook shop (worldwide)

Sunday 5 September 2010

"Run Run As Fast As You Can.....


You can't catch me - I'm a gingerbread man !"

I've had a really stupidly busy week and been working extra long days - even more than my normal long ones. Going to bed at 3am and getting up around 7.30am doesn't leave much room for play or fun ..... That's why there has not been much blogging of late - though I do have a couple of belated things still to post from right at the start of the month.


My mum was down visiting last weekend and brought Oliver a book The Gingerbread Man. I remember having it myself as a child. Mine was a hardback and gingerbread man was on a ribbon. There was a slot in my book so you could pass him through the pages.


Anyway - we've been reading that this week and reciting the main lines pretty much every where we go ! I decided it was time to make some gingerbread men (and bears). A few were delinquints - like the one with the spikey hair and big tummy and the one poking it's toungue out and having a bandaged arm... I used Martha Stewarts recipe - which you can find here.

I decided to make a load of teeny weeny gingerbread bears too band sandwiched them together with some butter icing made with th usual butter and incing sugar as well as ginger syrup.
Oliver and I made the dough yesterday morning and I baked it tonight after we got back from BEWILDERWOOD on silicone baking mats / tray liners. They only took 10mins for the large ones and 5 mins for the teeny weeny ones.


Oliver ran for hours and hours. Bewilderwood is THE most fantastic place for children and adults. We both had a fantastic time on all the tree top walks and there are some excellent slides.


Yup - no time other than the odd snap - you can just about spot Oliver high-tailing it up those stairs !


Some really cool tree houses and dens. Boat rides etc too. It's fairly expensive - but includes everything.... and worth EVERY penny.


You can't see how big or steep this scramble net is - but I'm looking down on Oliver climbing up. This is his second time round !


It's a pretty big complex at 50 acres. It's VERY easy to stay all day - even with a toddler. By the time we left to come home, Oliver was so tired he could barely stand, yet still didn't want to leave !


There is stuff for all ages - including slides and zip wire rides. This grandfather and two young boys were having a wonderful time on a swing for three ! The face painter they had was truly awesome. I think Oliver is a little too small - next year maybe... but there were full grown adult men and women going about with painted faces as well as the kids.

This place even makes adults feel 10yo again. I cannot tell you how good it is. If you ever visit East Anglia - TAKE YOUR KIDS TO BEWILDERWOOD !