Tuesday 30 November 2010

A Post For Chef Dennis (MTAMF) ..... BREAD !


I've been meaning to do post this for a while, but I'm so laden down with work at the moment that it's been nigh on impossible to keep my blog up to date.

You put a blog post on a month or so back about teaching the girls to make bread....

I've been making bread by hand for some time now, but have never tried :

1. fridge storing dough
2. artisan type with the tray and boiling water underneath
3. pizza / bread stone (it's been in my shed unopened for about 3 years !)

Anyway - I just wanted to acknowledge the source of the inspiration and share a few photos.


Previously, I've let me bread prove and bake on a tray. It's always been good bread. I'd no idea how to transfer proven bread from a tray to the oven without making a real hash of it. My pizzas NEVER ever got that crispy base either.... but they do now !


Well - thanks to your blog entry and link, I looked up and realised that to do this, I needed to basically put my dough on a scattering of semolina or corn meal on "something transferable" first. My Joseph Joseph chopping board turned out ideal as a substitue bread peel !

For others - the cornmeal / semolina literally acts like little ball bearings and allows the proven bread dough / pizza base to slide on to the pre-heated stone in the oven with a simple shunt. Excessive force for the shut is not required - the cornmeal / semolina does the work. :big thumbs-up)


The tray with boiling water definately adds to that thicker crust.

I'm still to attempt making sour dough and my own starter. I really want to have a go at that. Perhaps sometime between Christmas and New Year

And to sum up in one word....

THANKS !

Sarah-Jane Nash - http://www.siliconemoulds.com/ - silicone moulds, silicone bakeware, innovative cookware

Plain Sponge Recipe for XXXXL Cupcake Mould


By popular request.... An XXXXL Giant Jumbo Cupcake - this one. Many of you have seen and tried the recipe I last used in this which is HERE. However, I've also had loads of requests for a plain sponge recipe without the use of the apples.

Well - to be honest, I've not had occassion since to make such an enormously huge cake since. After all - even I couldn't dream of attempting to tackle eating a 4.25kg / 9lb cake without a lot of help ! PLEASE PLEASE try and ignore my icing. I went a bit nuts with yellow gel paste colouring and it WAS only slapped on with a few M & M's as sprinkles on Monday morning before work. It isn't here to look pretty.... it's here for functionality reasons only I'm afraid....

Photograph below shows our XXXXL Giant Jumbo Cupcake sat next to a Big Top Jumbo Cupcake. This shows how shockingly large such a cake is.


Do butter your silicone moulds VERY LIGHTLY and then dust with flour (tapping any excess out over the sink) before filling with your mixture. We want to try and avoid clumps of flour stuck to the finished cake as this doesn't look good and certainley wouldn't taste it. Buttering and flouring moulds always makes a massive difference though and means you cna still remove the cake hot if you have to !

Since I was home on Sunday with a poorly Oliver (who was rather snotty indeed), I figured it was about time to try and get another of these in the oven. As a test to see how quantities and mixtures worked out and tasted, the top part and bottom part were very different....

First of all, the mould was designed to be used in one piece. You fill the bottom side first, put it in the oven for about 30 > 40 mins and then fill the top side before putting back in the oven. Filling the base section first stabilises the top part, though you do need to carry to the oven (on a baking tray for support at all times) with care.

Recipe for Country Pound Cake

THIS FILLED THE LARGE SIDE ONLY AS IN PICTURE BELOW. I'D DOUBLE THE RECIPE AND PUT A COUPLE OF EXTRA CUPS ON THE MIX IN THE BOTTOM SECTION FROM THE SECOND BATCH TO TOTALLY FILL BOTH SIDES

3 cups all-purpose flour (plain)
3/4 teaspoon baking powder (next time, I think I'd double this)
 225g salted butter, softened ( I used salted butter and dont add salt
110g shortening
2.2/3 cups white sugar
5 eggs
1 cup milk
3 teaspoons vanilla extract

Basically, I creamed butter, shortening and sugar until light and fluffy. Add eggs one at a time and beat well between each addition. Slowly add in flour and milk (alternating between the two) until total volume is combined.

Preheat fan oven to 170degF

It's a LOT of mix. It came up to and over the top of the beater in my Kitchenaid !

A certain little person enjoyed licking the beater....


The mix more than 3/4 filled the base side of the mould. There is a photo below....


I put it (on a baking tray) into a preheated fan oven at 170deg F. After 1 hour, I opened the door and placed a silicone baking tray / sheet liner over the top of the cake. This was to stop the cake browning too quickly. A big cake like this generally takes a LONG time to cook. You could use baking paper to cover the cake instead - I like the silicone baking sheets for this though as it not only saves wasting paper, but also stays exactly where you put it - fan oven or not !

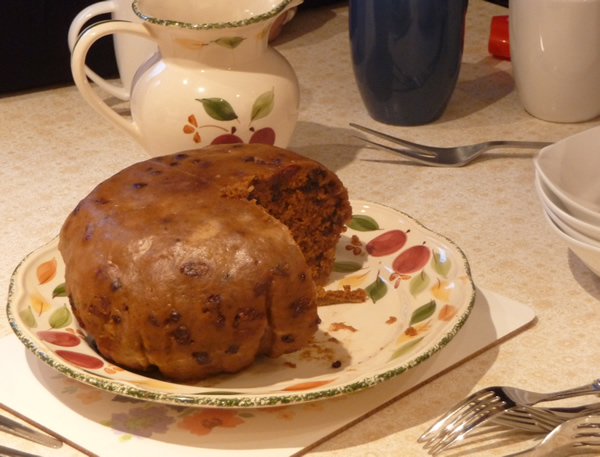
The cake tested done at 1hr 40mins. I should maybe have checked it a little earlier. As you can see from the photos, it rose by only the tiniest amount.


Texture is quite dense. It's a type of cake that would be quite good for carving into shapes. It was still quite moist when cut last night and is more than edible this afternoon. It wasn't even covered over last night and has been sat in the office at work. I think it should keep and slice quite well stored properly !

 On reflection, I think next time I would leave the silicone baking sheet over the top when cooling to lock in as much moisture as possible. I like to do that with dense type cakes (including Christmas fruit cake.)

As this cake rose very little and the top was nearly flat - there was very little waste as only the top crust needed cut off....

TOP SECTION

Well - this was a bit of a cheat. There really is not a recipe. This giant jumbo cupcake mould is a monster. A lot of people want to be able to make such cakes FAST, but so much mix is very time consuming to make and get in the oven

For this reason, I've been trialing commercial bakers pre-mix for genoise type sponge for various purposes and results in general have been good and exceedingly quick.

We're hoping to be able to start offering the Baker's premix in early 2011.

I used :

625g premix
180g sunflower oil (GRAMS - not MLS)
250g of water

There is no need to add anything else. Sugar, raising agent etc is all in the pre- prepared mix. You do not even need a mixer. A brisk mix with a wooden spoon to combine until smooth is all it takes.

This volume filled the top as in photo below. I think you would need approx 30% more to fill the base section.


As you can see - this rose a lot - so there was quite a bit of wasteage as the top needed cut level. I also covered this with the silicone baking sheet after about an hour - but this mix rose quickly and by an hour there was already a fairly thick top crust developed. The baking tray liner didn't cover the big domed top the way I would have liked. I think next time, I'd put the baking sheet over it quicker

Although a lot less mix volume than the Country Pound Cake recipe, it too a good bit longer to cook - just over two hours. Whether that's because I had it out and in the oven about 4 times to check doneness.... or something to do with the recipe - I have no idea at this time. Sorry !

-------------------------------------
At the same time, I was also trying something else. Several people have stated that they would like to cut the mould in half and use it as two separate pieces to cook at exactly the same time but on different shelves of the oven. This poses some problems....

The mould is designed to be used as ONE piece as the base part supports the top part when filled. The base part also needs filling FIRST to enable it to do this. Cut in half, the top part does not have enough support and WILL fall over in the oven as the cake rises. I know at least two of you have done this :-o

In order to find a way round cooking this in two parts, I actually cut my mould in half yesterday to see how I could support it and how it would perform.

The base section was fine simply on top of a baking tray.

I placed the top section inside an 8" traditional bakeware cake tin with a screwed up piece of baking paper on either side. There is a photo below. I'm pushing the mould back so you can see the paper...


It cooked no problem and did not move in the oven - nor on carrying to and from the oven :-)

Sliced yesterday. The commercial bakers premix was moister and less dense than the pound cake recipe but did have a thicker crust. It was more crumby than the pound cake. Both tasted just fine and to be honest, I'd be happy with either. However, next attempt with baking such a big cake with premix will be how to reduce the crust.

By the way, the bottom of the top section (very top of the cake) I carved into shape before plastering the whole cake with buttercream...

Hope this helps !

All the best

Sarah-Jane http://www.siliconemoulds.com/ - silicone bakeware specialist cookshop


Sunday 28 November 2010

Chocolate Covered Rum Balls - Ideal Christmas Gift !


These are really really easy to make and there is not even any cooking involved. Is that cheating ? They were SO easy to make, it FELT like cheating.

I made these at 3am on Saturday morning. No joke - honestly I did... On a Saturday, our shop NATURAL HEATING selling cast iron multi fuel stoves (wood burners) is open from 11am > 1pm. Two hours barely sounds like it's worth it, but at this time of year it's not uncommon for us to be packed out the door with customers and many have a long wait to be seen. People often come a long way to see us and view our stoves, so I like to be able to offer them a hot drink and a cake.

We only open for two hours as I have to take Oliver with me - and it's verging on impossible to work and entertain a toddler.


With the hours I've been working recently, I was getting TOO TIRED to make cake. That's why I decided to have a go at making these rum balls - which could double up as a practice run for starting Christmas Hampers in a couple of weeks.

I found and bookmarked this recipe from Joy of Baking a few weeks ago. It's astonishingly easy and there are all sorts of possible variations.

140g finely chopped almonds
120g of finely crushed vanilla wafers (I used the Askey's fan shaped ones to go with icecream)
70g icing sugar (original recipe says 55 - but it wasn't as sweet as I would have liked)
2 tablespoons cocoa powder
2 tablespoons of glucose syrup or light corn syrup
60ml of rum (I used 80ml)

Add all the dry ingredients together and give a good stir. Then add liquid glucose and rum. Mine was a little dry, so I added some more - just enough to combine and bind.

Additionally, I added about 60g of sultanas

Chill the mixture and then roll into 36 x 2.5cm balls

Well - I didn't chill mine, and I rolled them into rather large balls. I only got 24.... :-P More like two bites than one !


I greased my hands every few balls with some butter as the mixture is really sticky and then placed them on a silicone baking tray liner. I then popped them in the fridge for 30 mins whilst I prepared some toppings.

For toppings, I used some melted chocolate. I've had best results with chocolate using Callebaut Belgian Couverture chocolate for things like this. I used real, cocoa powder, icing sugar white and milk chocolate. I've always had poor results coating things using ordinary supermarket chocolate. The Belgian couverture chocolate is easier to temper and tastes nicer anyay....

I rolled all the balls in the melted chocolate which additionally had a tiny amount of butter added to help it flow a little better for coating. Tap the ball (balanced on the fork) on the edge of the bowl to get rid of excess.


Rather than just roll some in cocoa or icing, I DID first roll them in chocolate too - which gave them the spikey hedgehog look. I used two forks to roll them and lift them out.

With the ones that were only chocolate coated, I tried to drizzle with white chocolate. It was a bit of a globby mess. It worked well - but I'll actually do this with a piping bag fitted with a tiny plain round nozzle this time.

They hardened nice and quickly and lift easily off the silicone sheet. The excess left at the bottom of some was very easily trimmed away.

The cute snowflake wrappers arre a little on the big side for 2.5cm chocolates - but worked well with my big bruiser sized ones ! The wrappers are available to buy on our website and are ideal for mini muffins / cupcakes.

One of my colleagues asked me on Saturday "Did you buy those from Thorntons?". I told him off for being cheeky - until he correctly pointed out that's it's a rather good compliment if someone thinks they're bought from a chocolate shop.. Sorry Rich !


They do look really cute in little cellophane bags or homemade boxes. I'm almost sure I'll be popping these in my Christmas 2010 hampers.

Customers seemed to enjoy them - the rum balls disappeared quick enough. Given I only got 24 out of the mix however, I did then go on to also make carrot cake afterwards - but forgot to take photos. Oh well....

Sarah-Jane Nash - http://www.siliconemoulds.com/ - silicone bakeware specialist cook shop Nov 2010

Another First... Rabbit Casserole


Fist of all, I must apologise for my absence of late. I've been working extraordinarily long hours - often on the go for 18 > 20 hours in the day. There are just so many pre-Christmas orders to get processed and on their way to customers that there has been little time for anything.

I've not even seen that much of Oliver ! He's at nursery every afternoon and has spent the odd morning with a little friend. Our time together has been limited - though on Sundays we have been having a family day and all spending some time together. However, I've mainly spent today at home (apart from being out feeding the animals) since Oliver is a bit poorly with a bad cold.

I've often meant to try eating rabbit. It's easy to obtain here as we are quite rural and most butchers have it fresh during the winter season. For one reason or another, I've just never got round to it. Eventually, earlier in the month, I bought a jointed rabbit and turned it into this....


The casserole smelt wonderful - and the sauce was tasty. However, I really was not keen on the flavour of the meat and doubt I'll ever buy rabbit again. It just really didn't appeal to me.

Saying that - I bet the same recipe would be wonderful swapping chicken for the rabbit.... So, I'd use the recipe again (minus the rabbit !)

The rabbit I had was 1kg in weight - so I halved the quantities below

Rabbit Stew


ALL credit to Kirsten. Her recipe is copied and pasted below


2kg (4lb) Rabbit, jointed
285ml (½ pint) Chicken Stock
140ml (¼ pint) White Wine
2 tbsp Seasoned Flour
55g (2oz) Butter
1 Garlic Clove
1 Bouquet Garni
2 tbsp Double Cream (I actually used 4....)
1 tbsp Parsley
2 tsp Cornflour
2 tsp Tomato Puree
Parsley
Salt and Pepper

Coat the rabbit joints in seasoned flour and fry in butter in a flameproof casserole, browning on all sides.
Add the stock, wine and tomato puree, bring to the boil.
Add the bouquet garni, crushed garlic and season to taste.
Reduce the heat and cook gently for 1½ - 2 hours or until the rabbit is tender.

Transfer the rabbit to a serving dish, keep warm.

Transfer the sauce to a saucepan, removing the bouquet garni
Mix the cream and cornflour together, and stir into the sauce until thickened.
Pour sauce over rabbit and garnish with parsley.

Sarah-Jane Nash - http://www.siliconemoulds.com/, November 2010

Friday 12 November 2010

Christmas Fudge - who wants some ?


Homemade fudge can be SO easy and versatile to make - and makes a lovely gift at any time of the year.

It's no secret - I LOVE CHRISTMAS ! I love the smells of the spices and dried fruits, the colours and seasons cheer. It's even more special now that I've got a cheeky little boy to share it with. It's children and excitement and bringing of families together that make Christmas what it is to me.

This Christmas fudge is simply divine. A rich dark chocolate fudge base, full of spice, dried fruits and homemade apple brandy liquer. The top part is a white chocolate fudge laden with ground almonds and topped with flaked almonds. It's like Christmas cake without the cake. Gloriously creamy and smooth. It's not crumbly and it's not chewy (apart from the fruit)

Of late, I've barely had any spare time which is why blog posts have been so scarce. Actually - I've had ZERO spare time. There is not a day this week when I have been in bed before 3.30am. Too much work to be done... Pre Christmas orders are just crazy and the amount of emails to do, packing, paperwork etc is extraodinary. If you have been missing my blog posts, I do apologise. However, at the moment priority is to try and get orders out the door at speed so everyone can get baking and crafting.

Well - I started making this batch of fudge about 1.30am this morning. Mainly as a gift for a neighbour. I think it's a combined sorry and thank you in one !

Blackie ; one of our pet chickens; decided to wander 1/4 of a mile down the road and take up residence with an elderly couple..The elderly man found out that she belonged to us and came to let me know. Blackie is normally the friendliest little thing and you can literally walk over and pick her up. Not in the neighbours' garden....

The man had tried chasing her round the garden with a leaf rake to chase her out. He'd also tried throwing a tarpaulin over her. Poor Blackie was petrified. Every time I went down to try and catch her - she'd leg it at warp speed. The garden was full of dense shrubbery patches and laden trees of rosy apples. It was very secluded being totally surrounded by 40ft high pine trees on three sides. I tried stealth. I tried foor. We tried cornering her and we tried a big fishing net. Couldn't get remotely close.

Blackie wasn't daft. She was roosting at night in the pine trees and had learnt how to climb ! The minute a human entered the garden, Blackie went up the tree. Up, up, up - so high up that instead of a big black hen, she looked like a little black speck.

It's been a good two months that Blackie has been away. But finally the old man and his wife managed to catch blackie with a big trap and a long fishing line that went across the garden and in the dining room window. Trap baited, I believe they waited several days for hours at a time on poor Blackie being tempted by their lure.

I'll take some fudge round tomorrow morning and hopefully make some more "Peace". They seem ok about it - though they didn't really want a chicken as a long term lodger.

RECIPE FOR BASIC FOOLPROOF FUDGE

125g salted butter
12 normal sized marshmallows
3/4 cup of evaporated milk
2 cups of sugar

180g chocolate (use white for light and dark for chocolate - I never use milk for this !)
up to 1 cup of dried fruit / nuts / chopped biscuits

Basically - that's it. Put the first 4 ingredients in a large pot. It's best in a non stick pan. Ordinary is fine - but the bottom has a tendancy to catch slightly. Cook over a medium heat, stirring. As soon as it comes to the boil - set your timer for exactly 5 minutes. Keep stirring and when the 5 mins are up, remove from the heat. DO BOIL FOR EXACTLY 5 MINS. Less than 4.30mins and it won't set. More than 5 mins and it starts to get grainy.

Add in the chocolate - either broken or chopped and stir in until it melts. Quickly, stir in your add ins and then pour into our silicone 8" x 8" fudge pan. Leave to cool. I like to refridgerate overnight before cutting into nice chunky squares. It will keep a good 2 > 3 weeks in an air tight box in the fridge. The 8" square silicone bakeware mould holds one fudge batch properly (just over 1/2 full)

 If using a tin, grease very very very well. You'll still curse, swear and perhaps have to pour boiling water over the base to get this stuff out. I really DO recommend silicone for making fudge. No greasing etc - just pour the hot fudge straight in.

This recipe is VERY versatile and I start with my basic recipe above and then adapt.

CHRISTMAS FUDGE

Base layer - add 2tsp mixed spice to the 4 top ingredients. Instead of 3/4 a cup of evaporated milk, I used about 1/2 the amount in evaporated milk and the other 1/2 in my homemade apple brandy liquer. I mixed in dark belgian chocolate, with sultanas and cherries


We've got these fab new moulds. Actually - I've had these ones for a while but just have not got
round to putting them on the website. I originally intended them for small soap loaves - but they are fantastic for a deep layered fudge or small slicing bar type layer cakes - ideal for a couple to share over a couple of days. I've just recently started using these before promoting them and have already fallen for them big time.

I used four moulds for this double fudge project. I filled the first 3 moulds half full with the dark chocolate fudge base layer.

My top fudge layer was the basic fudge recipe with a teaspoon of Sainsbury's Taste The Difference French Almond extract. I added white chocolate to this and 1/2 a cup of ground almonds. It's smooth, distinctly almondy and much better than marzipan !

I poured some of the top almond fudge layer over each dark chocolate, boozy spiced bottom layer and quickly pressed on lots of slivered almonds to the top. Top layer is only about 1/2 the thickness of my bottom layer. The fourth empty mould was 3/4 filled with the remaining almond fudge.

After cooling, I turned out the fudge bars and sliced it. Each slice was cut again into three fingers. It looks just like Christmas cake and has some powerful kick of the dark chocolate, smooth almond top, apple brandy, spices and fruits.


It looks really pretty boxed up in homemade boxes. I love to make little peep through windows with acetate as a sneak preview of what is inside.

Blackie is happy to be home and once more eating from our hands and following at our heels. I for one am very thankful. Hopefully the neighbours are none the worse for their experience ! Sorry....


Sarah-Jane Nash - http://www.siliconemoulds.com/ - silicone bakeware specialist cook shop, November 2010

Thursday 4 November 2010

Scottish Clootie Dumpling


Clootie Dumpling is a traditional Scottish fruit pudding. It's super served freshly made and hot on it's own or with custard. Also popular fried along with sausages on a Sunday morning. No wonder Scots have a history of heart disease...

Anyway - Clootie Dumpling gets it's name from the cloth it is cooked in. The prepared mix is put into a cotton cloth (pillowcase would do if that's all you have) and loosely tied with string to leave room for expansion. It is then put into a pot of boiling water and boiled for 4 hours. The pot will regularly need topping up with water to cover the dumpling.

Oliver and I went a trip up to Scotland last weekend to see my parents (his grand parents). Having recently had his birthday - there was a promise of clootie dumpling. I've not had clootie dumpling in years. My Gran (who is no longer with us unfortunately) used to make us a dumpling every birthday instead of cake as per our heritage tradition. Underneath our slice would be hidden our lucky coin (wrapped in either greaseproof paper or foil).

The recipe as follows belonged to my Gran and was passed to her by her mother (my great grandmother) - so dates back to around 1850.

Oliver helped his Nanny make the dumpling ! For once, I had no part in this other than in the eating. I'll apologise now - I couldn't get any photos in decent lighting in the kitchen...


Recipe for Clootie Dumpling - Jean Inglis Knights

4 cups plain flour
2 rounded teasp baking powder
pinch salt
100g suet
2 tablespoons sugar
2 tablespoons black treacle
2 teaspoons mixed spice
1 teaspoon ground ginger
1 teaspoon cinnamon
400g currants
100g sultanas
mix with milk or water as required to combine

You want a really thick porridge like consistency - almost verging on dough. It's not like a bread dough - just mix well with a wooden spoon.

See the video and Oliver will show you how !


Wet the dumpling cloth and then flour it. Tip the dumpling mix onto the cloth. Gather, and tie loosely to leave room for expansion. Not really loose. The dumpling is going to get about 50% bigger and needs to fill the cloth. Too saggy, and you'll end up with a bag of gunge after cooking !


Here is a tied clootie....

Now - this needs to go into a large pot of boiling water and be regularly topped up. Cook for 4 hours.

After cooking, remove from pot and take off the cloth. The cloth can be washed and reused. My mum still uses my grandmother's cloth.

The outside will be pale and sticky. You now need to pop it into an oven at around 180deg C for a short time for the skin on the outside to dry off. As soon as the outside starts to dry and look a little leathery, it's ready to serve.