Online worldwide cook shop selling of Silicone Bakeware Moulds, for making cakes & bakes, jellies, soap, and many other uses.
This Blog aims to show all our latest ideas, recipes, photos, competitions and news of upcoming products
It's been a week of cake here in Norfolk. A load of testing for some new mould designs I'm working on for early next year and Oliver's 3rd birthday
RECIPE
160g icing sugar
160g ground almonds
4 large egg whites, separated into two equal batches -
160g caster sugar
80ml water
1 tablespoon lavender sugar
1/2 tsp violet gel paste food colouring
Sift the almonds and icing sugar and lavender sugar together. Blitz with a blender or in a mill. Add the food colouring paste / gel to two egg whites and put this on top of the icing sugar / ground almond mix. The colour should good SERIOUSLY STRONG. It will lighten when you add the egg white / syrup mix and again on cooking. You do want gel / paste as liquid food colouring is not strong enough colour and can thin the batter and interfere with the rise.
Heat caster sugar and water together until they reach 110deg C. Whip 2 egg whites to stiff peaks and then slowly drizzle and whip in the hot syrup to these until it becomes shiny and stiff. Avoid getting any syrup directly on the beaters if possible !
Fold the whipped egg white / syrup mix gently into the other bowl of mix. I started by adding a spoonful and mixing that through to loosen it up and then folded the rest in.
Transfer this into a piping bag. Pipe into small rounds on grease proof paper or silicone baking sheets.
You need to stand the macaron mix like this on the sheets for about 30mins or so until the surface does not stick to your finger when touched BEFORE you bake it. Otherwise, your shells are likely to crack and the finished result really isn't the same (been there - done that !) Put on some sprinkles (if using) now. I sprinkled some dried lavender on top.
Pop into a 145 > 150deg C oven for approx 15 minutes. Remove and immediately slide silicone sheet or greaseproof paper off the tray onto the work surface.
Leave to TOTALLY cool before removing. If even slightly warm, the insides of the macaron will leave themselves stuck to the paper or silicone sheet.
To make the lavender sugar, put some sprigs of fresh lavender during the summer months in a container o granulated sugar in exactly the same way as you would to make vanilla sugar. Rosemary sugar is lovely too and also made in the same way.
For the white chocolate gananche, I used 150g of chocolate and poured over 200ml of scalded cream. Stir to melt the chocolate. When melted and cooled to room temperature, put in the fridge for a little while until firm enough to pipe.
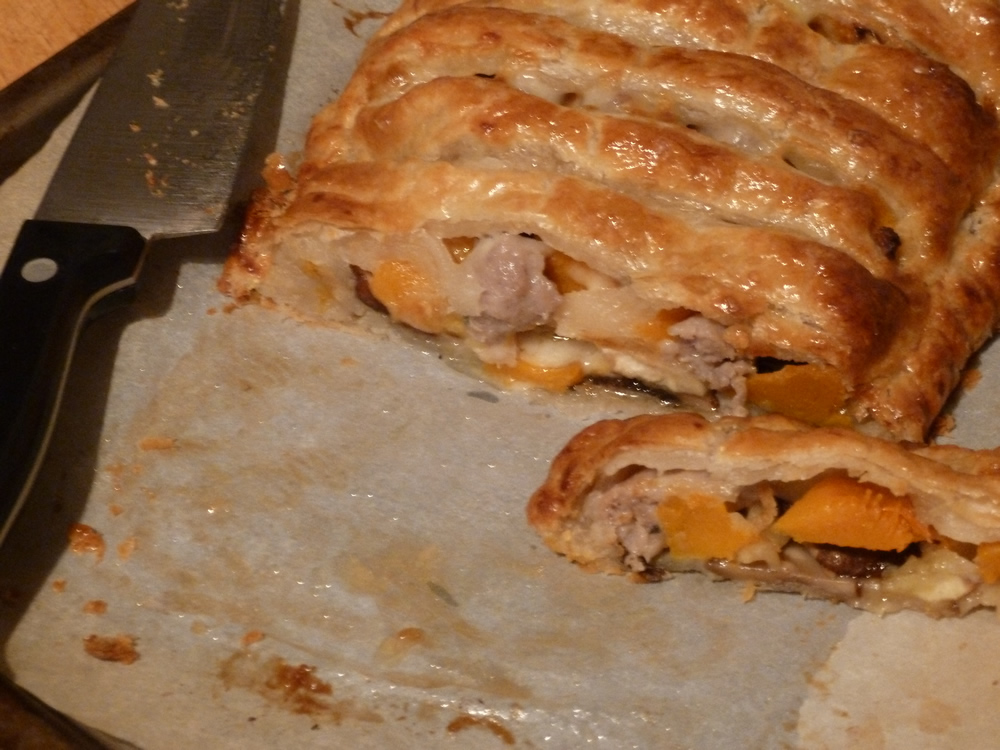
Forgive me. This could be quite a large blog entry and photo heavy as I've got loads of photos etc this time to share. Unfortunately, the photos of my Jalousie do it no justice at all - but time and light were not in my favour....
Jalousie is a fancy name for an otherwise basic slatted / latticed tart or freeform pie. It can be as simple or as fancy as you wish. With so many lovely autumnal vegetables freshly available, it seemed silly not to put them to good use. I've come up with this amazingly delicious combination. It doesn't look overly special, but hey ho - we all have bad photo days. You'll struggle to go wrong if you choose to create your own. Whether sweet or savoury - shove all your favourite things in.....
jalousie[ˈʒælʊˌziː]
n
1. (Fine Arts & Visual Arts / Furniture) a window blind or shutter constructed from angled slats of wood, plastic, etc.
2. (Fine Arts & Visual Arts / Furniture) a window made of similarly angled slats of glass
[from Old French gelosie latticework screen, literally: jealousy, perhaps because one can look through the screen without being seen]
Jalousie shown above was served with fresh beetroot steamed in a foil packet with cumin
Recipe (serves approx 4 > 5)
I prepared this the night previous to cooking and refrigerated overnight - simply for convenience.
1 x 500g block pre-made puff pastry
2 > 3 good quality butchers sausages (omit for vegetarian option)
3 medium sized chestnut mushrooms (optional)
8 > 10 cooked chestnuts
1 small butternut squash
50g grated gruyere
some finely chopped fresh sage (if available)
Peel, de-seed and cube the butternut squash into approx 2cm chunks. I think I had around 350g of prepared raw weight. I drizzled these with olive oil and quickly roasted them on the top grill of my halogen oven at about 220deg until starting to brown. You could put them in your jalousie raw, but I wanted faster cooking time and something that could be shoved in the oven after work the next day...
Next. prepare the chestnuts. I used fresh sweet chestnuts and roasted them quickly on the top shelf of my halogen oven. I find that after cooking, cover them with a damp cloth to keep them hot and moist makes them easier to shell. I've made a rubbish little video of this... You may prefer to use canned or vaccum packed chestnuts for convenience !
Next, roll the puff pastry out on a silicone pastry rolling mat to approx 12" x 14". Using a blunt table knife, cut this down the middle into two equal pieces 6" x 14" (approx).
Start layering the ingredients - starting with thinly sliced mushrooms and chopped chestnuts. You can see I've then added the squash on top, sausages (removed from skins and rolled into balls approx 1cm dia.) before finally topping with the gruyere.
Top with the second piece of pastry and crimp round the edges. I use a fork handle and pull it up and over. This jalousie was so full, I really thought it may well burst out the seams !
If refrigerating overnight before baking, do cover with cling film to stop it drying out.
Glaze with a beaten egg before baking. I baked this at 210deg C Fan oven for about 25 mins.
----------------------------------------
It's Autumn here in the UK, and it's been bright, sunny, warmer and drier than is generally normal for this time of year. We live in East Anglia - which is also known as the "Bread Basket" of Britain. It's prime agricultural land that offers the best of UK growing conditions.
Being lucky enough to live in a rural area like this has lots of advantages. In the (almost) 10 years I've lived here, I have NEVER bought eggs from a shop. Ok, so we have chickens now, but prior to that or in winter months when they don't lay so many - it's so easy to stop by a farm or house with a stall and honesty jar by the side of the road. Simply take what you need, put your money in the jar or tin and off you go. Easy as that. Good, locally produced, seasonal fruit and vegetables on our doorsteps.
I stopped just down the road earlier this week to buy a pumpkin and also saw those pears for sale. I love the photo above - they look so appealing. What an absolute shame I cannot stand pears ! I love the fact that this way of life often allows me to get hold of some produce I'd never find in the supermarket and unbeatably fresh (as well as inexpensive).
The other direction from home, I can currently get wet walnuts, honey and duck eggs - oh - not forgetting cider vinegar and more varieties of pressed apple juice than you can dream of.
There are lots of local farmers markets. These are generally run on Saturday mornings at local villages. Most alternate, so you know which Saturday where the market is. Wymondam Farmers Market is probably my favourite and on the 3rd Saturday of the month. This time of year, I generally work Saturday mornings - so getting to one of the markets is a rare occurrence.
I was at work today, but took last Saturday morning off due to being very poorly the day before. Oliver and I took a quick trip to Wymondham market to grab some goodies on offer....
Here is Oliver - munching on a cracker given to him by the lady on the fish stall. I don't know whether it because he was looking cute or half starved that he managed to wangle a cracker, but it certainly raised a huge smile ! Of course, he had to carry his own bag. He likes to choose things. He carries the light ones and I get the heavy stuff. First stop was for vegetables (loads of teeny weeny onions, butternut squash and broccoli.
From the fish lady, we got some lovely oak hot smoked salmon and a fresh dressed crab as well as a little pot of peeled brown shrimps. An expensive treat - but made a lovely Sunday evening meal with some thinly sliced toasted sour dough.
This guy is from ChillisGalore.co.uk . I used to mail order from them a long long time ago. They make some awesome chilli sauces, jams and jellies. My dad particularly likes their limited addition Lemon Drop Chilli Jelly and I managed to bag 3 jars for him last weekend...
Beautiful selection of Artisan Breads. I generally don't tend to buy this sort of bread as I adore making it myself given any excuse.... So much of it is such an irresistible smell though at the market ! Oliver picked a huge Rosemary and Olive oil Focaccia and a good 1/4 of had GONE in his tummy before we even got it home ! I chose a couple of little savoury tarts for tea - goats cheese and red onion and I think the other was pea, spinach and feta ? Sorry - I've forgotten. They were eaten a week ago...
The cake at the front is a new creation from Dr Tim Kinnaird (pastry chef and runner up of Masterchef 2010). I brought it home for my husband - but did have a little taste. I cannot find what it is online, but it was some sort of creamy brulee type top with a chocolatey middle and alcohol soaked sponge base. I'll tweet him and maybe we'll be lucky enough to find out.
This is some of the stuff we came back with. Notice I trimmed the focaccia up at the back since Oliver had eaten huge chunks on the way home !
Oliver ADORES macarons and picked a Salt Caramel macaron from Tim which was demolished in no time at all. After spending a small fortune at the market, we went into the library down the road for a little while. I'm ashamed to say we left about 20mins later without me even having a chance to read to Oliver - attempting to do so just resulted in continuous coughing fits and an inability to breathe. He had to put up with just having a browse on his own ! I'm a bit better now since the doctors started me on some steroids at the beginning of the week.....
On getting back to the car, Oliver found some massive piles of leaves and had such a ball jumping in them and kicking them in the air. If his back had not been facing me most of the time, I'm sure I could have got some super shots ! After that was over, Oliver was BEGGING for another macaron (rolls eyes). We walked back up to the market and he snagged the very last salted caramel macaron. I did ask nicely for a bite - but was told "NO WAY MUMMY !" I'd have bought my own macaron, but believe it or not, the diet is still going strong and I'm now 2st down..
That wasn't the end of the day.... from there we ended up at Goodies Farm Shop for locally stone milled flours and some locally reared meat from their in-house butchery. A coffee in the cafe was very welcome and Oliver munched his way through a lunch of some rather nice looking sausages and chips.
Coming home, we made some of those Rye Crackers I showed you from the sour dough bread course.. Well - I put the ingredients out to sit overnight and we made the crackers the following day. Good rolling Oliver (ok - you had a LITTLE help !) These were MASSIVE !
I'm popping the recipe in here for my convenience - since I often use my own blog recipes on the Ipad in the kitchen !
Knead for 10 > 15 mins in Kitchenaid. Cover and leave overnight.
Next day, roll out balls of approx 50g as thinly as possible on to a silicone mat floured with rye flour. Prick with a fork. Brush with water and top with flaked sea salt and seeds / spices etc ( we used fennel on some and cummin on others).
Bake at 200deg C for approx 10mins
Couple of girls out riding on a stubble field one morning this week....
Some of my ponies in the field.... growing winter woolly coats. The one in the middle is Digger who you may remember was born in January this year.
Henrietta and scruffy looking Chicky (the chick we hatched a few weeks back).
Oliver (still sporting a chocolate face) and I - taking photos of yourself with a camera is never a great idea.... But here we are !
Sourdough bread is something I had been meaning to have a go at making for some time.... and another thing I had never got rough to doing.
It involves nurturing and feeding your own live yeast in order to make bread. Sounds rather daunting, but in reality it's not such a big deal.
Victoria and I took a day class last weekend with Rosie of Virtuous Bread in Norfolk. It was a relaxed day of fun and sticky doughs and stinky yeast starters ! Bit bonkers I suppose since I've been eating very little bread of late, but I booked the course some time ago and there is nothing to stop me making bread (even if I rarely eat it at the moment).
We made the 100% rye loaves above, a wholemeal and white loaf and the rye crackerbreads below.
Of all, the rye cracker breads were my favourite. The wholemeal and white loaf was a bit too sour for my palate. Then again, I'd never even tried sourdough before attending the class and I think it is a bit of an acquired taste.
The starter that Rosie (above) uses is a gloop of fermented rye flour and water. I believe it dates back to 1857 ! She is having it lab tested at the moment to try and trace back more details of time and place it first began. The results will be interesting....
Victoria, weighing out 50g balls of rye dough to make large crackers
A small amount of the starter is used and needs fed prior to baking with more flour and water and is then left for about 12 hours to get bubbly and gassy. I've actually been doing some considerable playing with mine over the past week... feeding twice daily with wholemeal flour, water and a teaspoon of lemon juice. The lemon is because we are in a very hard water area, so the lemon reduces the ph and helps get my starter more active.
I've found that by feeding it with double the amount of wholemeal flour and water, letting it mature then discarding all but 1/4 of a cup and feeding again just prior to use, makes for a less sour taste.
I've been eating a lot of soup at the moment as an evening meal. A pot tends to go a long way as my husband is not that fussed on soup - so it can be the same soup for 5 days in a row if I make a big batch. This is rarely a problem with a good pea and ham soup as it's so delicious I never get bored with it !
I make this in an electric pressure cooker as it's so quick and minimal fuss. You can obviously make it in a pot on the hob - or even in a slow cooker if you want to - and just adjust the cooking times.
Ingredients
1 smoked ham hock
1 large onion (peeled and quartered)
2 or 3 bay leaves
2 sticks of celery
5 vegetable stock cubes
500g dried, split green peas
Rinse the dried green peas thoroughly and then soak overnight in some cold water.
Put the smoked ham hock in a pressure cooker with the bay leaves, celery and onion. Cover with water and bring to pressure for approx 35mins. Alternatively, simmer in a pot with a tight fitting lid (or put in a slow cooker) until the meat is soft and falling apart.
Remove the ham hock from the water (now ham stock). Strip off and discard the skin and fat. Separate off the meat and set aside.
Put the soaked peas into the pressure cooker with the vegetable stock cubes and ham stock with onions and celery. Top up with water until you have a total of approx 3 litres.
Bring back to pressure for approx 15 mins (or cook until the peas are literally mush). Blitz with a hand blender and serve with some of the shredded ham hock meat on top. I additionally had one of the rye crackers we made at class alongside this. Very filling and yummy !
Sarah-Jane Nash, October 2011 - www.siliconemoulds.com
Well - if you want a really good basic cake recipe to use for birthday cakes / cakes for special occasions - or even just something plain and simple. I guess this has to be it.
This cake has a fine but dense crumb and cuts beautifully. It would make a super cake for carving.
This is the second time I've made it - this time in our new heart shaped bundt / tube pan. I have not dusted it with icing sugar - nor glazed it. This way, you can see absolutely all the details and it's impossible to hide any flaws ! To be honest, the cake does not need it. It's delicious as is, but adding a glaze when warm and letting it seep really makes it truly something special
Ingredients
some slivers of almonds
2.3/4 cups of flour
1/4 cup of corn flour
1/2 teaspoon salt
1/4 teaspoon baking soda
225g salted butter
3 cups white sugar
6 eggs
2 teaspoon vanilla (or almond) extract
1 cup double cream, with a good squeeze of lemon to sour
Preheat oven to 150deg C.
Take your bundt / tube ring pan - (I used our new silicone heart bundt bakeware mould) and lightly butter the inside. Dust with flour and tap out any excess over the sink.
Cream the butter and sugar together until pale and fluffy. Add one egg at a time, beating in well. After each egg, beat in a tablespoon or so of sieved flour to prevent the mixture curdling.
Once half the remaining sieved flour has been added, add the cream and flavouring extract, followed by the rest of the flour until just combined but no flour remains visible.
I put some slivers of almonds in the base of each heart shape so that these would show on the top.
Bake at 150deg C for approx 80mins until a toothpick comes out clean. As you can see, the mix did not QUITE fill to the top of this silicone mould.
As the silicone is very flexible, it was no problem to roll down the top of the mould once the cake had cooled.
I inserted cocktail sticks into the cake at the same height every 3inches or so right round the outside. I could then use these as a guide to cut the top part of the cake off with a serrated knife..... taking care not to cut the centre piece in the middle.
This off-cut was enough to serve 6 people in it's own right - it's a pretty big cake !
This is what it looked like after I cut the domed top part off, using the cocktail sticks as a guide. Perfect way to get a level cake !
Invert on to a serving plate and it's done.
If you want to glaze, try making a paste with orange or lemon juice and some icing sugar. Pour on the top whilst still hot and allow it to soak in. If the cake has cooled, you can always heat the orange / lemon juice and icing sugar until liquid and pour over the top as a syrup.
Sarah-Jane Nash (cheating - I made this in August !) - October 2011 - www.siliconemoulds.com
Diets are all well and good, and for the main part I have no trouble sticking to one once I get started. However, every now and again, it's nice to have a little of something nice - perhaps something chocolatey yet not too sweet.
I saw a recipe for a yoghurt based chocolate mousse served with fresh fruit in one of the food magazines a month or so ago. I cannot for the life of me remember which one and cannot find it now to be able to cross reference for you. Anyway, I've modified the original recipe somewhat and it looks much different from the original. It's easy and quick. You get a nice chocolate hit from the dark chocolate and the mousse - without it being over sweet. That said, I can't think of anything that beats a really luxurious mousse made with cream.
Even I could eat one (JUST ONE) of these without feeling guilty as my once a week special treat. The rest went into work and to nursery with Oliver for the teachers. Leaving them sat in our fridge would have been temptation overload and besides, one was just enough !
I decided to make some little fluted chocolate cases with our new 12 cell fluted tart mould. This silicone bakeware mould is now also available in a larger 6 cell size. These little filled shells would make an ideal canape type dessert to pass round on a tray at a party... or perhaps to serve three different combinations as a dinner party dessert. Each one is little more than two bites.
Ingredients
200g dark chocolate (for the shells) (plus extra for seeding)
150g dark chocolate
8 tablespoons greek yoghurt
3 large egg whites
2 tablespoons powdered (icing) sugar
12 cherries
2 to 3 tablespoons of cherry preserve
Melt the chocolate in a double boiler. I like to boil some water, pour in a saucepan and simply place the broken chocolate in a glass bowl above the water until melted. Remove the bowl from the saucepan and stir in some broken pieces of chocolate to the melted chocolate until no more will melt. This procedure is called "seeding" and is a method of tempering chocolate to prevent the white mildew looking marks when the cocoa butter separates.
Using the back of a teaspoon, coat the inside of the 12 fluted mini tart mould with the chocolate. Refrigerate to harden and then repeat.
To make the mousse, melt the remaining chocolate and allow to cool.
Whip the egg whites with the (sieved) icing sugar until they reach firm peaks.
Stir the yoghurt into the chocolate and combine well, then fold in the egg whites using a metal spoon.
Put 1/2 to 1tsp of cherry preserve in the bottom of each chocolate shell and then top with some mousse. Refrigerate to set and then decorate with some chocolate curls and cherries. The little flowers on top of some of mine are made from modelling chocolate left over from making the chocolate roses in an earlier blog post.
Product description as copied from Amazon :
Review
"combines a wicked sense of humour and wacky illustrations... Children will laugh out loud" Booktrusted News
Product Description
Bertie has shockingly dirty habits, from nose-picking to weeing on the flowerbed! Whenever he does anything dirty, Bertie's family shouts "No, Bertie! That's dirty, Bertie!". Will Bertie ever kick his horrible habits?
A couple of weeks ago, I was sitting in the doctor's surgery with Oliver whilst we waited on my husband to be seen. There were about 7 or 8 people all sitting waiting to be seen (at a guess all 70yo +).
Oliver was the centre of attention and they were all sitting watching him play on the floor with a little toy car h had brought with him. In fact, many were being incorporated in his play and the car was zooming between feet. Had it been busy, I'd have had him say up nicely on a chair - but from the moment we had gone in he was the sole source of entertainment and bringing quite a number of smiles to some elderly people.
Anyway, eventually the car is no longer proving a distraction and Oliver decides he wants to read a book. The kiddies books in the doctors surgery are in pretty dire condition and falling to bits after many years of use. I was rather surprised when he came back from the little library area with an almost brand new looking book.... DIRTY BERTIE.
By this point, my husband is in with the doctor (prior to recently being admitted to hospital).
Oliver : " I like this book Mummy, it's Mrs Butcher's favourite !" (Mrs Butcher is his nursery class teacher)/
Oliver climbs up on my knee with the book. "Read it out loud Mummy. The old man will like this story".
Little did I know what was in store as I start reading the first page. "Louder Mummy - we can't hear you ...."
So, I start reading a bit louder. Comments from the other patients waiting indicated they did indeed want to hear the story too !
Every page that turned, the more Oliver giggled, the more the patients giggled and the redder my face got. I'm not kidding - this is one hideously embarrassing book to read in public to a small child. I swear someone put that in the doctor's surgery out of pure spite.
By 3/4 of the way through, I couldn't read it without laughing from sheer embarrassment about the vile habits of Dirty Bertie. Just when you think the worst is over .... the last page is something like....
"But Bertie does not do these horrid things any more. He's usually a good boy. However, when no one is looking, Bertie picks huge green bogies out his nose, puts them in his mouth and EATS THEM"
I suppose it made a few people laugh... but I was NOT amused when Oliver came back with another Dirty Bertie book - after having read that one. Your children will no doubt find this book hilarious - but I'd seriously recommend avoiding reading this one in public !
First of all, apologies for my absence and not responding to previous comments.
The last few weeks have been very hard. My husband has been very poorly and was finally admitted to hospital on Monday last week. He did get home yesterday, but is extremely weak. It will be a long slow road to his recovery.
On top of that, I've got pneumonia and feel SO rough at the moment and little Oliver is now full of the snots. I can't lie down as breathing is almost impossible and the coughing unbearable.....so may as well do a middle of the night blog post and catch up a bit...
Garlic and Honey Marinated Lavender Lamb Kebabs
Gosh. That was a bit of a mouthful for a blog post title !
Saying that, I've eaten this twice for dinner in the couple of weeks and thoroughly enjoyed it.
There really is not much to this, and it could be easily scaled up to suit several people. There are no specific quantities ! It's makes an easy, quick and tasty meal.
Diced Lamb
some sprigs of lavender from the garden (can substitute with rosemary)
honey
lemon juice
garlic
Put the diced lamb in a non reactive bowl (such as glass). Add a good squeeze of lemon juice and a crushed garlic clove and approx 2 teaspoons of honey. I'd suggest this for one serving - so you'll likely need more of everything to scale up the recipe.
Give it a stir and leave (covered with cling film) for at least 1 hour to marinate.
Thread the marinated diced lamb pieces on to the lavender sprigs (or rosemary stalks with leaves removed). The flavour from the lavender or rosemary really infuses through the meat.
Put on a baking tray and drizzle with about 1/2 teaspoon more honey per skewer. I'd suggest two skewers per person (perhaps just one if serving with pitta bread and salad)
Grill in a halogen oven at about 230deg C on the top rack for approx 12 > 14 mins, turning once during cooking until a lovely golden brown.
I ate this with a fresh fig, drizzled with 1/2 tsp of honey and some diced cucumber in a tablespoon of Greek yoghurt with some chopped red chilli.
Here is my little cake tester about 2 weeks ago, wearing his new chef's outfit....
Oliver hard at work making chocolate krispie treats !