Friday 30 November 2012

Spiced and Iced Sweet Potato Pecan Loaf

I adore the warmth and fragrance of seasonal winter spices. Cinnamon, ginger, nutmeg, cloves. All deep and woody. They smell the way they make you feel - wrapped up in a warm and comforting blanket.

To go with them, the autumn and winter seeds, nuts and vegetables in a glorious array of colours. Sweet potatoes, pumpkins, and pecans are some of the best.

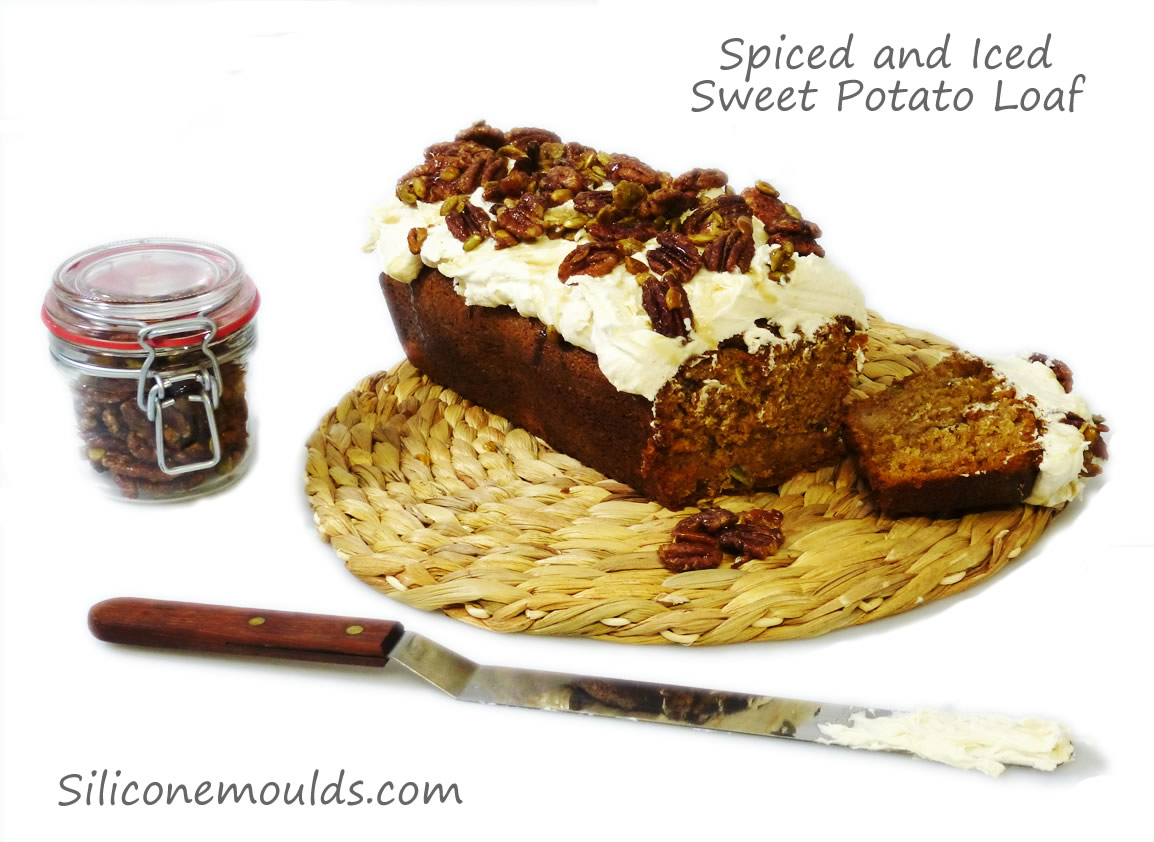
This cake recipe I've created is a mix of almost them all. Sugar, spice and all things nice !

Recipe - for the cake

200g / 8oz plain flour
200g / 8 oz sugar
100g / 4 oz of sunflower or corn oil
3tsp baking powder
2 beaten eggs
1 cup sweet potato (mashed) - or use pumpkin / squash
2 tsp ground cinnamon
1 tsp mixed spice
a good pinch of ground nutmeg
50g of roughly chopped pecans

Sift dry ingredients and then mix in wet until thoroughly combined.

Transfer into a 2lb silicone loaf pan mould which has been lightly greased with butter and then dusted with flour. 

Bake in a 170deg C fan oven for approx 55mins or until a bamboo skewer comes out clean.


Recipe for the Buttercream 

125g of softened butter
3 > 4 cups of sieved icing sugar
1 tsp vanilla extract
2 tbsp of maple syrup
small amount of milk as required to bring it together

Spread the buttercream frosting liberally over the top of your cooled cake, then drizzle the top lightly with a little more maple syrup.


Recipe - for the  Caramelised Spicy Pecans

1/2 cup of  caster sugar
40mls of water
knob of butter
1/4 tsp of cinnamon
1/4 tsp mixed spice
pinch of cayenne pepper
1/4 tsp salt
150g of pecans
2 > 3 table spoons of pumpkin seeds

Boil the sugar, water and butter for about a minute without stirring. Pour into a bowl over the mixed nuts and spices. Stir well.

Spread into a single layer on a silicone baking sheet. Pop into a 160deg oven for about 5 mins. Stir well and then flatten out again. Put back in the oven for another 5 mins. Keep a watch they don't burn !

Remove from the oven and stir well. Spread out flat once more and leave until cooled and sugar has hardened and caked to the surface. Break up if required. This recipe creates enough spiced nuts to liberally scatter over TWO cakes, or enough for one cake and a small jar as a gift.


Sarah-Jane Nash - SiliconeMoulds.com - November 2012

UPDATE - 3rd December..

Made this cake and took it along to December Clandestine Cake Club in Norwich.

Car was all loaded up with passengers. Only Oliver to drop at home with my husband. When we arrived, the house was in darkness. Steve was poorly and had gone to bed !

Oliver was very excited "I'm coming to cake club !"

Wasn't much else for it but to go for a little while complete with a little boy who really should have been going to bed !


Almost ready for bed, Oliver dragged blankie all round the venue.

Oliver looks carefully, then chooses a piece of Lucy's spiced chocolate cake !


Lorraine and Oliver do stickers !


Oliver loved the knitted Nativity and enormous knitted Christmas tree (yes , really) in the Sainsbury Centre, Norwich

Thanks to everyone at CCC - especially Lorraine for the stickers and Lucy for the santa and snowman that were on top of her cake !

Thursday 29 November 2012

Chef John's Awesome Lamb Vindaloo


I was lucky enough to find the recipe for this via Google the other day. I'd removed a couple of lamb shanks from the freezer the night before, intending to slow cook them in caramelized red onion and red wine sauce with feta.

Right at the last moment, I realised there was no red wine and went rooting for a recipe to rescue my poor lamb shanks. Chef John's recipe did just that. His original recipe is available on his amazing blog at Food Wishes. I tweaked it a little to make it compatible with the contents of my fridge and kitchen cupboard as below. I've put it on my blog for my reference as I know I'll make this again and again...

To Serve Two

Marinade

1/4 cup of cider vinegar
2 tablespoons of sunflower oil
2 tsp Tamarind paste
1 tablespoon garam masala 
1 teaspoon of salt.

Mix ingredients well and put in a bag with the lamb shanks to marinade overnight.

For the sauce base, liquidise the following

1 chopped onion
300g tomatoes
1/2 a cup of water
6 cloves of garlic

Spices

1.1/2 tablespoons of ground ginger
1 tsp of cinnamon
2 tsp whole mustard seed
1 tsp ground black pepper
1 tsp ground cumin
1.1/2 tsp cayenne
1 tablespoon of paprika

Shove the lamb shanks in a very hot oven for approx 20 mins to colour.

Brown a chopped onion until very brown (verging towards burnt !) in a couple of tablespoons of clarified butter. Add the spices and toast for a minute or two until mustard seeds are popping. Add the wet mixture and stir well. 

Add the lamb shanks to the pot and simmer on a low heat for about 2.1/2 hours until the meat is tender and falling off the bone.

I served this with mixed wild rice with some raw chopped yellow pepper mixed through


Teapot Balance Class With Kaysie Lackey At Pretty Witty Cakes


A couple of weeks ago, I was lucky enough to be able to attend the Teapot Balance Class with Kaysie Lackey at Pretty Witty Cakes (in Sussex).

Kaysie is an American cake designer from Seattle and specialises in extraordinary cakes ...... many of which are gravity defying structures !

Never having made more than simple shaped cakes in the past, Kaysie's teapot class was a little daunting and sure to push me out of my comfort zones. The class was very full on - creating this amazing piece took a total of 27 hours over three days.


Carving cakes to form the teapot created a LOT of mess and crumbs !


Teapot base crumb coated with buttercream and ready to cover in fondant.

Pretty Witty Cakes is a superb venue and has many visiting international tutors and pupils.

How Amy (PW staff) manages everyone's names and what they take in their tea / coffee is beyond me. It just kept coming ! I've never been so well hydrated in my life :-)


End of day two - a colourful array of some of the teapots, cups and plates / saucers all painted and dry ready to be assembled the following day. It looks as if most of it has already been done - but there was still so much to do !


Cobblestone bases, cake tables, assembling teapots and cups with spouts and handles and then the overall construction.

There is quite an element of fear in putting one of these together. In the very last moment's, it could all go so horribly wrong !

I must say, I've never before had to use screwdrivers, plastic pipes, metal rods and other bizarre things to construct a cake. There were a few concerned students when Kaysie went looking for a hammer...

If you ever want to try making a cake with a difference, I'd thoroughly recommend having a go at this class. Kaysie is back at Pretty Witty to take classes in summer 2013.

Thanks to Kaysie Lackey and the staff of Pretty Witty (including Suzi's husband - who will probably find half his tool kit missing next time he needs it !) 

Tuesday 20 November 2012

Matcha Green Tea Macarons & Double Sided Macaroon Mat


I love making macarons. If I'm honest, I like making them more than I like eating them (though they are yummy too !) Some people still call these macaroons - but macaroons are very different (though just as tasty) and made from dessicated coconut.

I adore the pretty colours and being able to make them all so uniform and perfect in size and shape. It's so satisfying when things go right to pull two trays of perfect macarons from the oven. Baking on our Revolutionary Double Sided Macaron Mat means you can make every macaron identical in size.


Sometimes it may take you a few attempts to get the hang of baking macarons. The key is making sure that the batter (macaronage) is neither under or over mixed.

You'll find my Youtube video tutorial on making Macarons here.


Recipe (makes 75 x 2" dia shells = 37 macarons)

180g ground almonds
200g icing sugar / powdered sugar
2 tsp Matcha green tea powder
180g egg whites (split into two batches)
200g caster sugar

Preheat your oven to 150deg C fan.

Grind the ground almonds and icing sugar together until very very fine.

Add these to a large bowl with the matcha powder and 90g of egg whites. Mix to form a thick, smooth paste.

Put the caster sugar in a pan with 80ml of water and boil to 118deg C without stirring. When temperature hits 110 deg C, start whisking the egg whites to firm peak.

Slowly pour the sugar syrup into the egg whites, whipping constantly. Continue to whip until thick and shiny and cooled - but a little warm.

Fold the whipped egg whites / sugar mix into the paste making sure not to leave any streaky traces of paste mix of white meringue. It's ready when a ribbon trail of the macaronage starts to disappear into the rest of the mix within about 20 seconds.

Pipe on to your double sided macaron mat to within about 5mm of the ring of each cell. Please refer to my video tutorial in the link above if you need to see how to do this. The macaronage will relax to fill each cell.

Rap the tray on the worktop a couple of times to help release air bubbles.

Put trays in the oven and bake for 5 mins with the door open. Shut the door and bake for a further 20mins.

Allow to cool thoroughly before removing from the mats.

Fill with white chocolate ganache or vanilla buttercream.

To make white chocolate ganache, use 3 : 1 ratio of melted white chocolate and scalded double cream. Allow to cool until thickened but pipe-able or spreadable.


Here is Oliver in the office with Spencer bear and a macaron. 

Spencer is the bear from nursery, and Oliver was lucky enough to be chosen to bring Spencer home and look after him for the weekend.

Oliver was very proud to bring Spencer home. Daddy and Oliver showed Spencer how to light our stove and make the house lovely and cosy.


Unfortunately Spencer had a little accident and got sopping wet when Oliver dropped him in a great big puddle. He had to spend a few hours on the fire guard drying out whilst Oliver and I took the motorbike (powered by feet) that he got for his birthday out for a ride.....

As always, we stopped off to see Bess the dog just down the road. She's such a sweetie. Even she seemed puzzled by why Oliver was still partially dressed as a pirate !


Typically - EVERY puddle was for splashing in. This kid was SOAKED more than Spencer by the time he got home....


Nutty About Madeleines - Bite Size Little Sponge Cakes (Recipe)


Do you like Madeleines ? You know - those little French teacakes that are normally a pretty shell shape ? Oliver ADORES madeleines. They are his favourite cake at the moment and I believe his face light up if he is lucky enough to find one in his lunch box at nursery !


Above is some madeleines I made from this recipe in the classical shape using this silicone bakeware mould. The rest of the batch, I actually baked in an almond / nut style silicone chocolate mould to create dainty autumnal petits fours.

Believe it or not, they were quite quick and not at all fiddly to make. These were demolished by customers coming into Natural Heating to view stoves a couple of weeks ago. The couple of little children that came in with parents particularly adored them !


Recipe - adapted from Allrecipes.co.uk

Use either our 20 cell nut shape silicone bakeware moulds or 3 x standard madeleine pan (or a mix of both !). I like to spray the moulds with cake release before use, or grease with butter and then dust with flour (tapping off any excess).

  • 2 eggs
  • 2tsp Frangelico hazelnut liquer
  • 125g icing sugar
  • 100g plain flour
  • 1/4 teaspoon baking powder
  • 125g butter, melted and cooled

Preheat your oven to 170deg C Fan / 190deg C normal and prepare your pans / moulds.

Beat together the eggs and Frangelico. Add the icing sugar and continue to beat for about 4 minutes until thick and creamy. 

Sift flour and baking together and then fold this in in 2 > 3 batches, then fold in the butter.

Spoon or pipe into the moulds. The nut moulds are shallow, so fill those full - but only fill the madeleine moulds 3/4 full.

Cook until the tops are golden and the sponge springs back under your fingers. Takes about 12 mins for std size and 9 mins for the nut size.

For large size : Allow to cool, them dust with icing sugar.
For the nut size : carefully trim the tops and then sandwich together with some melted chocolate mixed 50:50 with nutella and allowed to cool until thick enough to spread


Sarah-Jane Nash - www.siliconemoulds.com - November 2012